Exactly which materials you need depends on which activities you want to do, where your school is set, and how old your pupils are. Most ancient school materials are not disposable but re-usable: the ancients were very into sustainability. This requires a bit of an attitude shift from pupils used to endless sheets of paper. You’ll need to ask them to be careful with the materials and not damage them, otherwise you’ll have a lot of maintenance to do.
Wax tablets and styluses
Writing on wax tablets is usually a big hit, and the tablets aren’t hard to buy. We use these: https://www.der-roemer-shop.de/Wachstafel-14x9cm-Tabula-cerata-Didius-schwarze-Schreibtafel-Roemer-Mittelalter-reenactment, which are authentic and durable. If you buy double tablets (which are sometimes easier to find than single ones), we recommend separating them since one per pupil is plenty.
You can also make your own tablets, though that may be more work than it’s worth. If you try this, note that the wax needs to be soft; modern paraffin is too hard. The authentic stuff is of course 100% beeswax, but soy wax is cheaper and even softer than beeswax (you didn’t hear this from us!). You can colour the wax with candle dye; the authentic colours are light brown, black, and red, but not white. To be authentic, a tablet should be small enough to be held easily in one hand; larger sizes need desks to write on.
Styluses are easy to make. Just take a straight stick about the diameter of a pencil, sharpen one end in a pencil sharpener, and trim the other end flat with a knife to make the eraser. We make styluses from shoots pruned off local fruit trees, but a dowel or any other suitably-shaped piece of wood will do as long as it isn’t hollow. The points wear down with use, so you’ll need to resharpen them periodically; it’s worth making the styluses not too short to begin with, since like pencils they’ll get shorter over time.
You can also buy metal styluses, which often have a wider erasing end that makes erasing easier. If you do go this route, be careful not to get styluses that are too thin and sharp, as those can really hurt someone – there are ancient stories of children killing teachers with their styluses, and some authentic practices are better left buried.
You may want rulers so that pupils can rule lines on their tablets before writing, as ancient children often did. Coffee stirrers work well for this. We ask pupils to rule lines one coffee-stirrer-width apart and to write between those lines; that causes them to write small, which enables them to fit in more text. If you let them write big, they often end up with only a few words on the tablet, which doesn’t allow them to actually do the exercise. Plus they end up coming back to you very quickly if they don’t write very much, and swift returns cause long queues, which in turn can cause bored pupils to misbehave.
Our tablets come in little cloth bags, and we find those useful for keeping tablet, stylus and ruler together. But if you use this system you’ll want to make sure that the stylus and ruler end up behind the tablet, against the wooden side, rather than against the wax. Because if they are against the wax they get wax-covered, and then some pupils consider them dirty and don’t want to touch them.
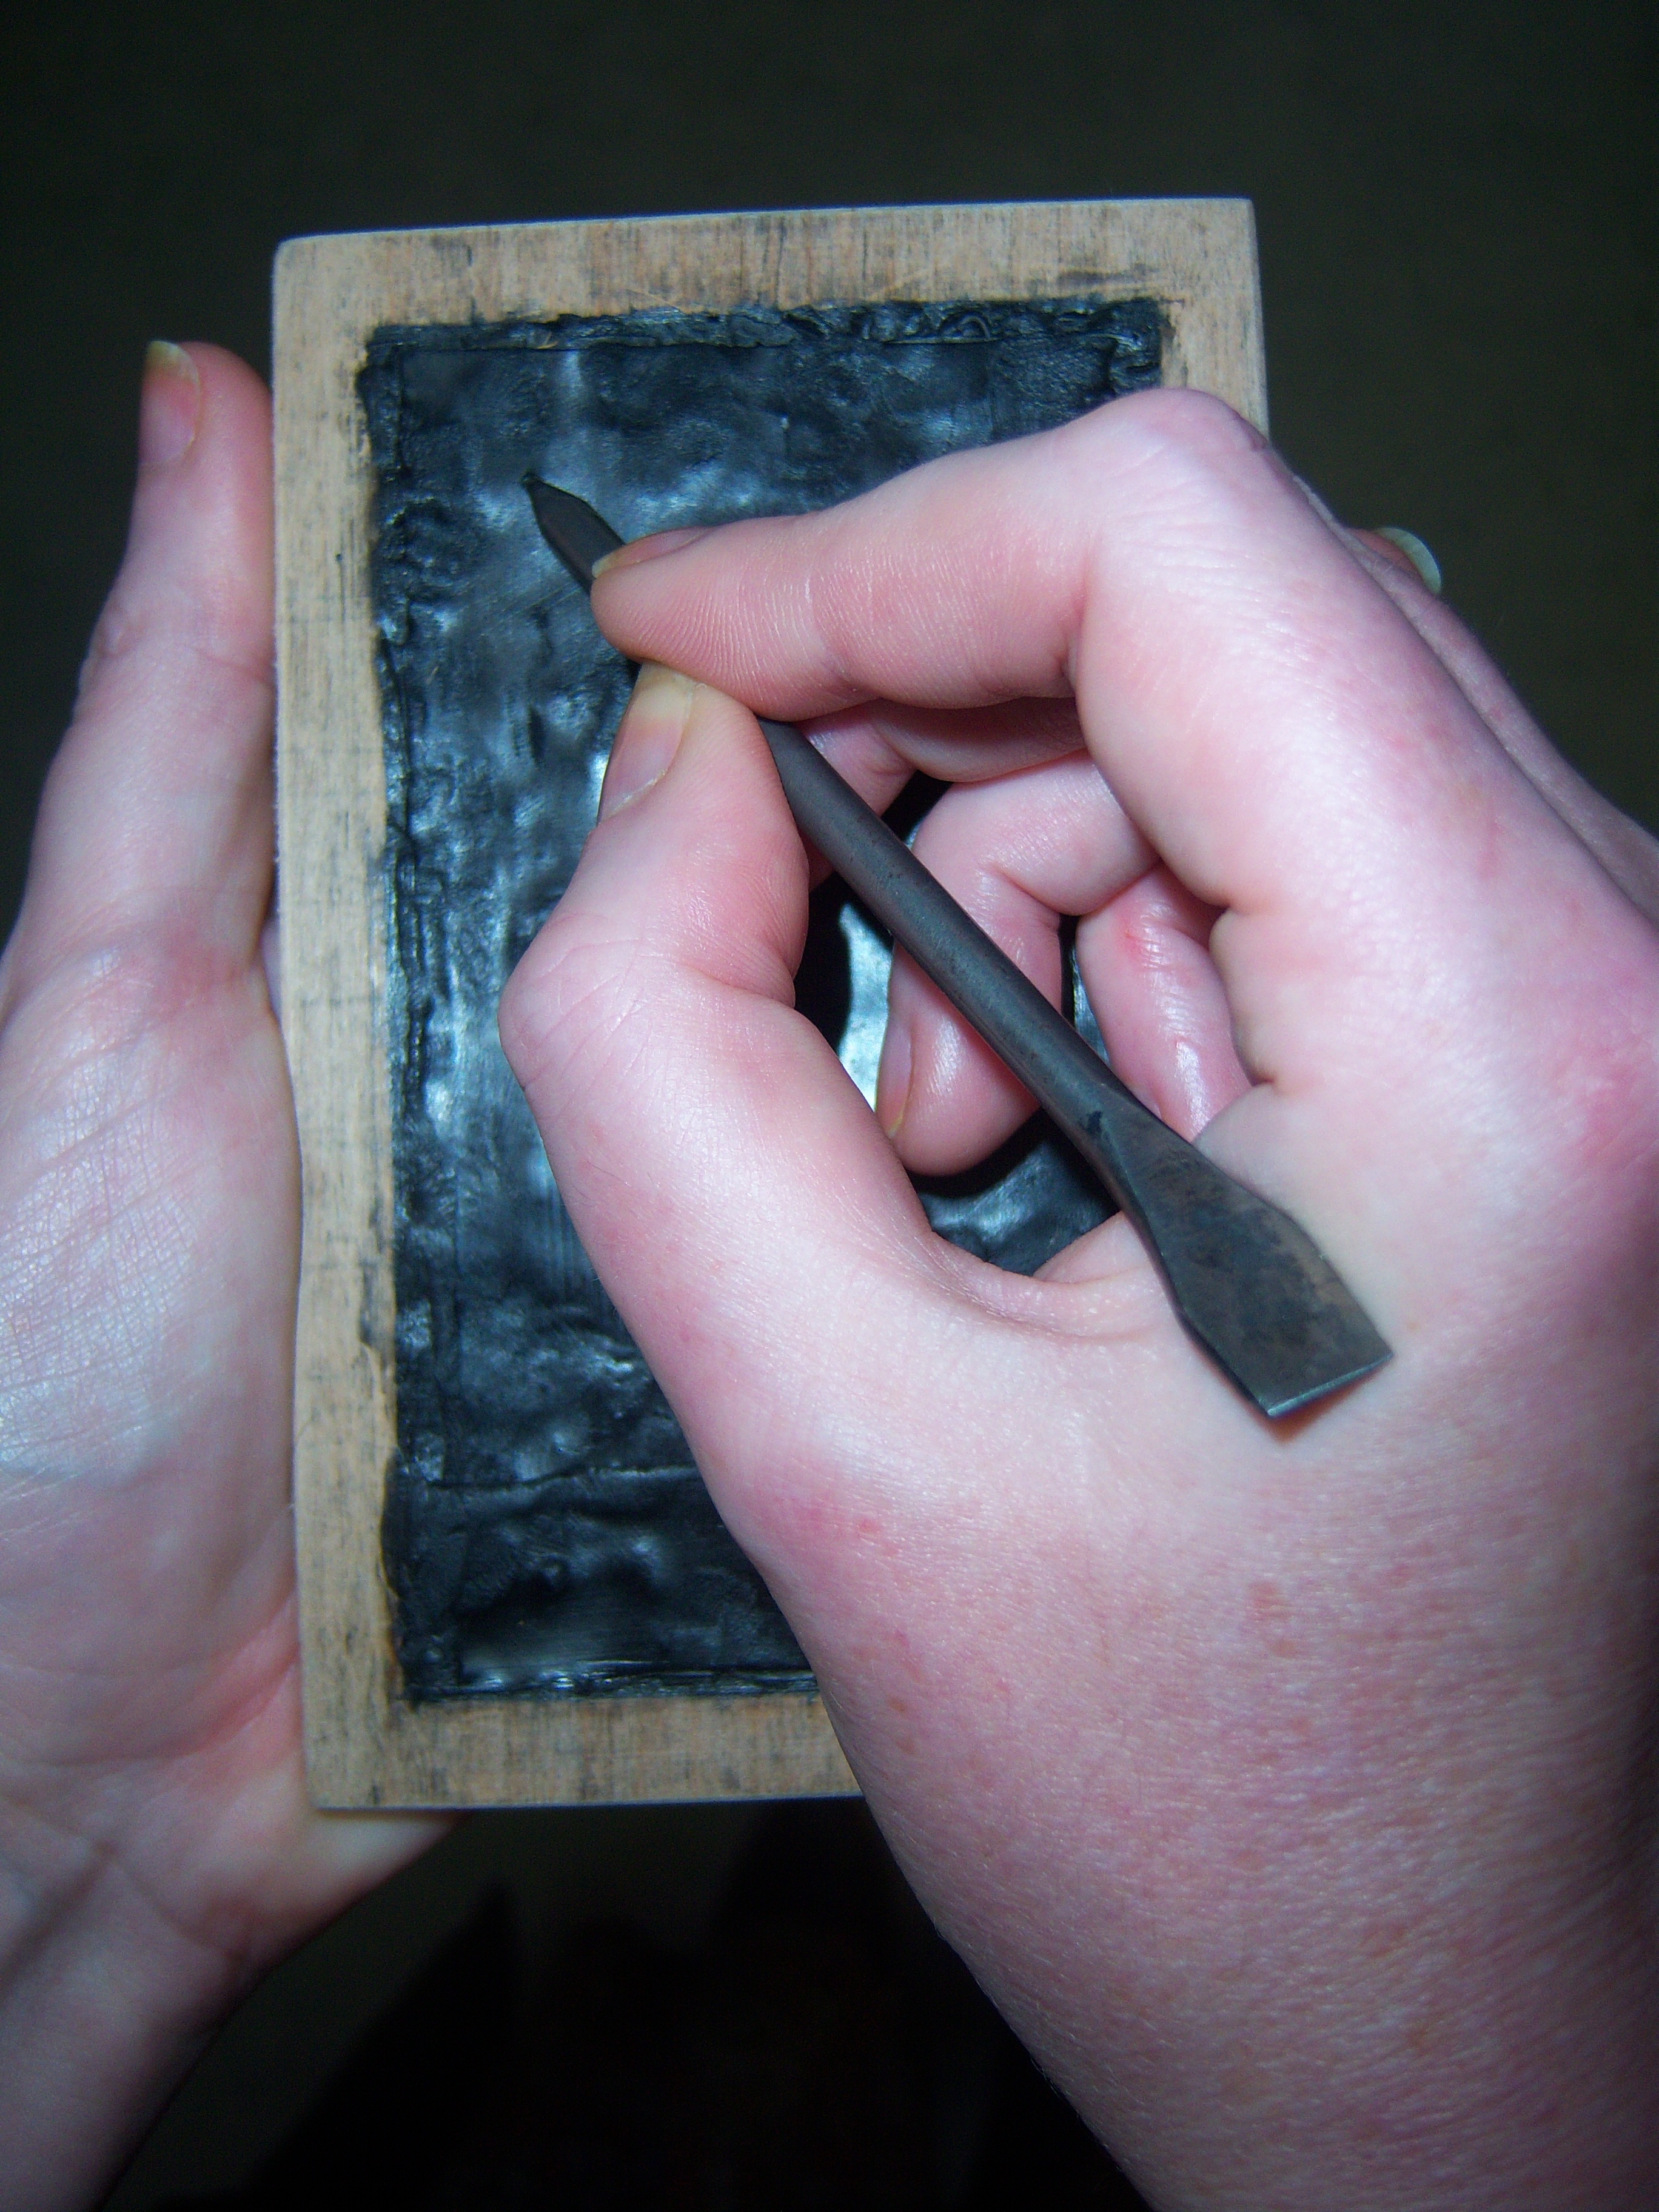
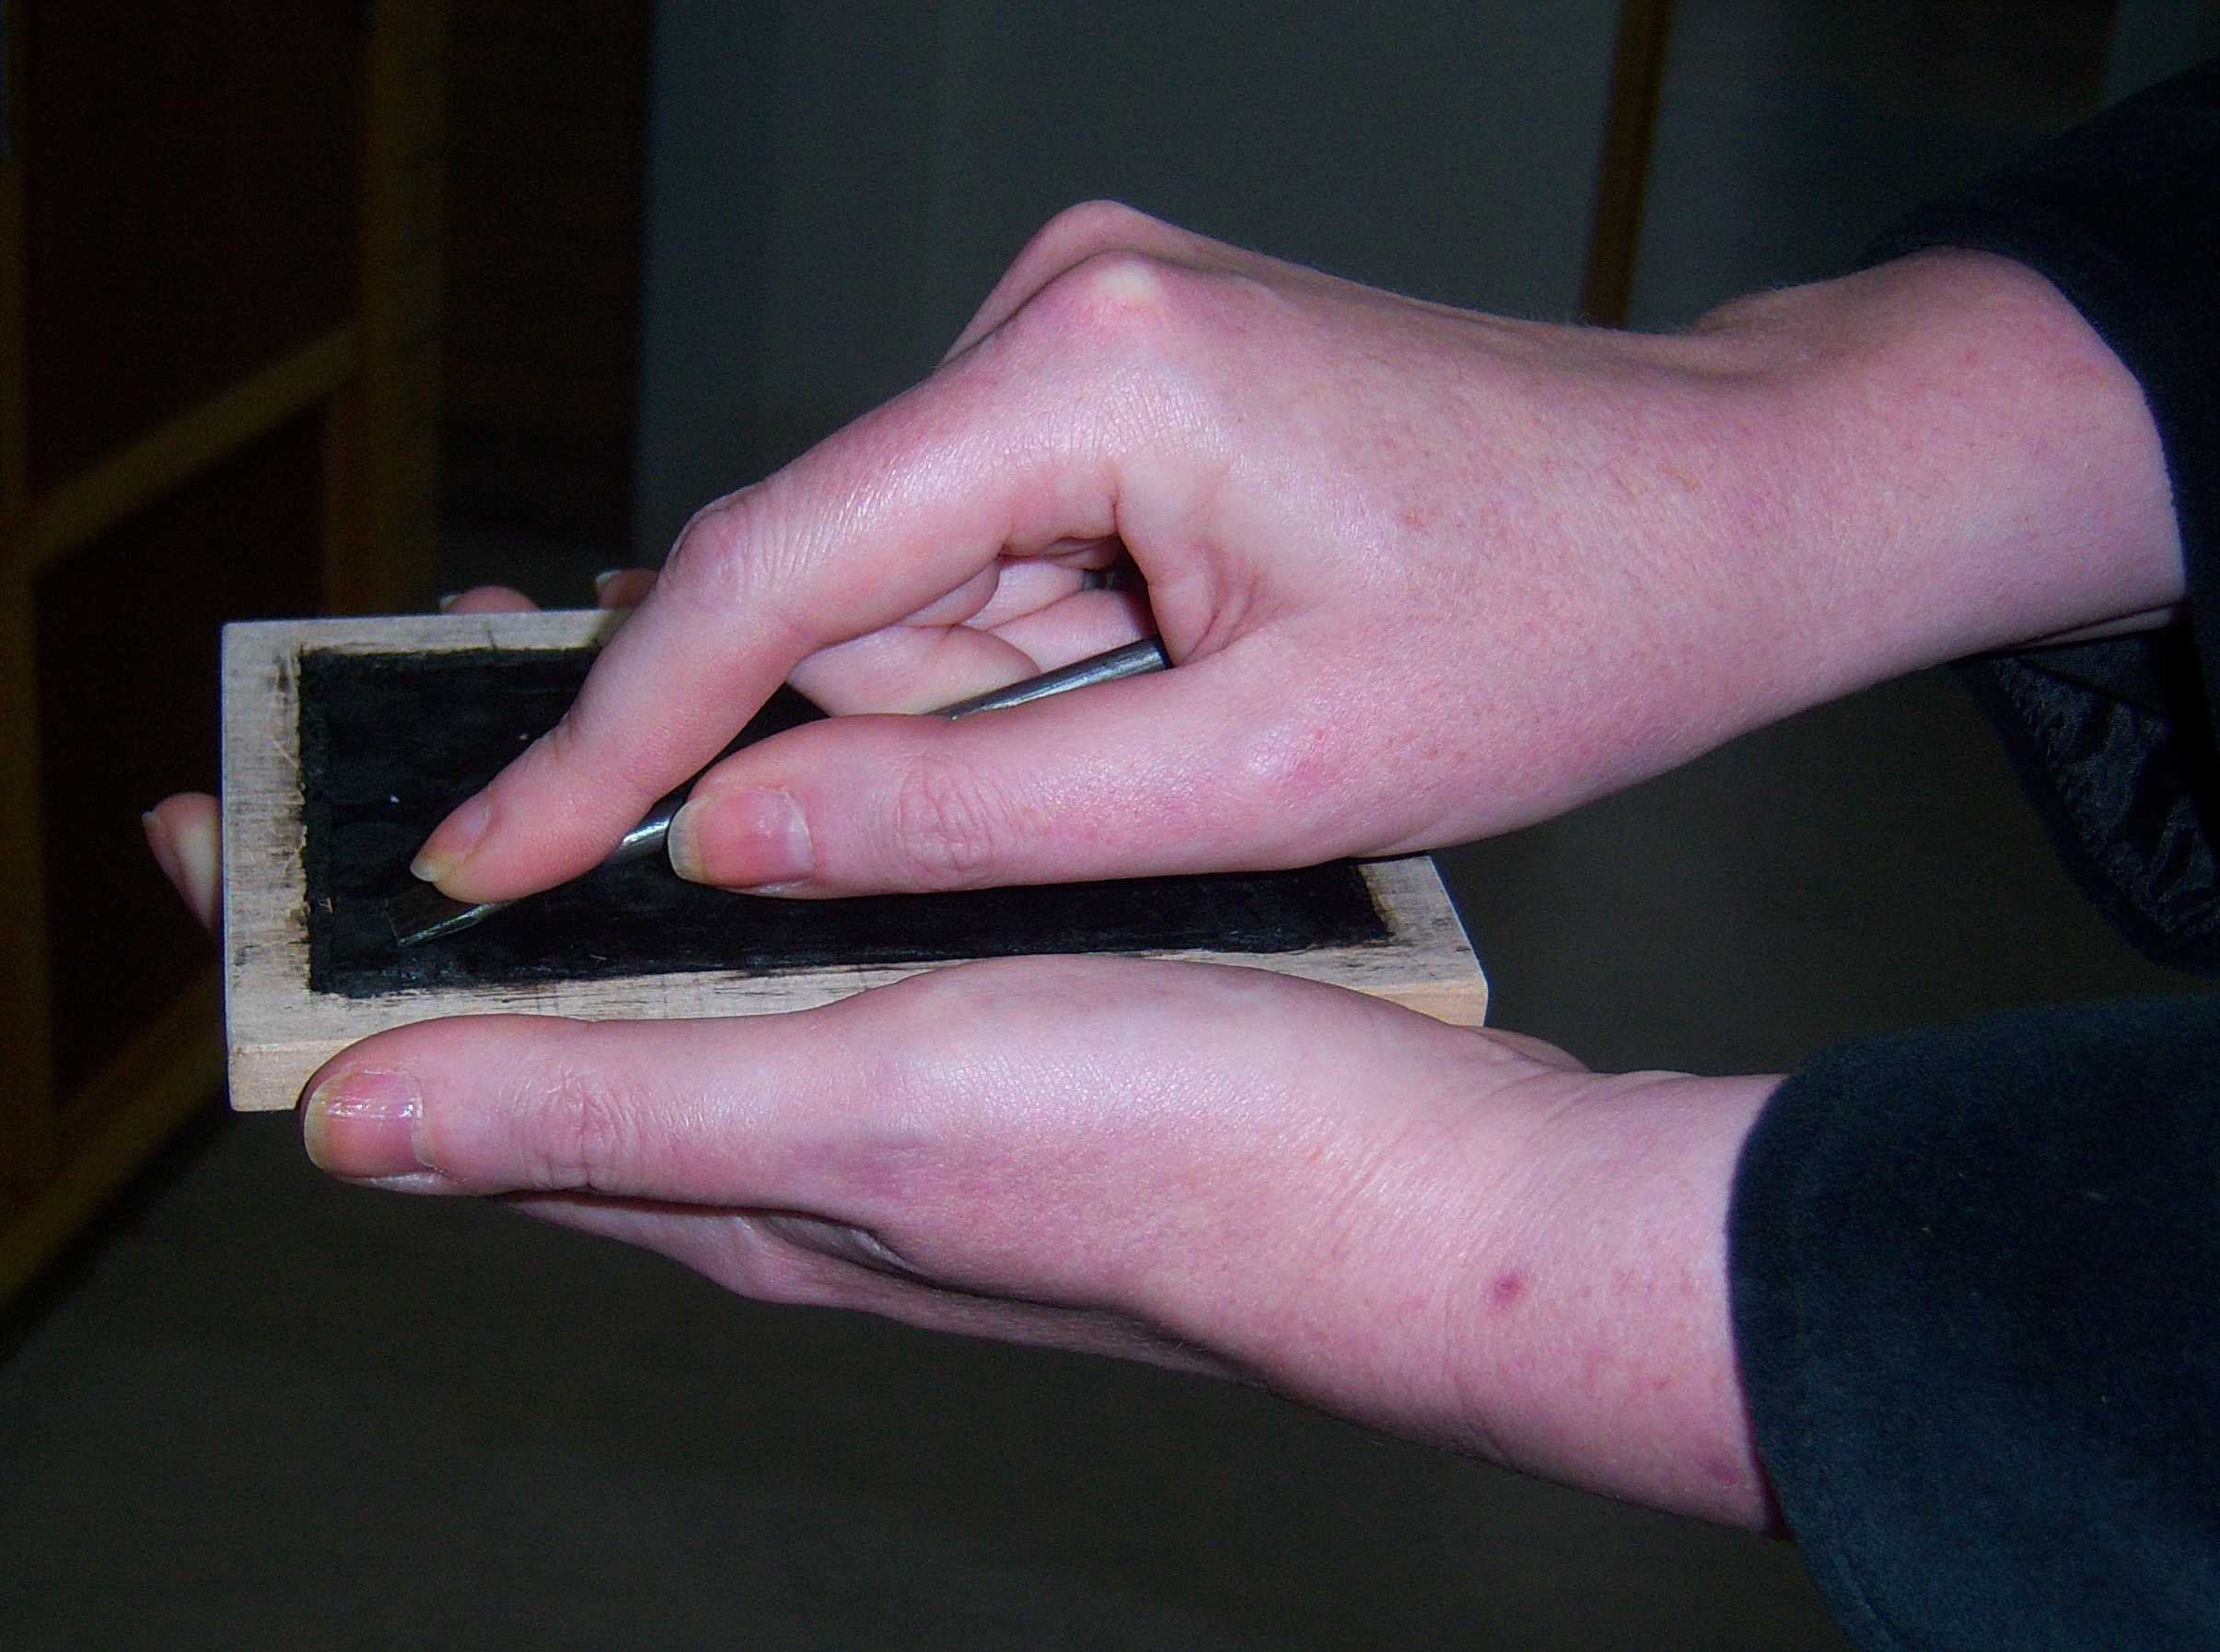
It’s a good idea to show pupils how to use the tablets, to avoid too much damage. When writing one holds the stylus like a pencil and doesn’t press too hard: if you go all the way down to the wood you dig out lots of wax that then gets in the way of legibility, so the object is to write lightly enough not to produce wax residue. When erasing one holds the stylus not like a pencil but with all fingers on top, so that it is nearly parallel to the tablet, and pulls it across the wax to smooth out the surface. Of course, erasing is far easier if the writer hasn’t pressed too hard. It is authentic to wait to erase until one wants to re-use the tablet, so we normally give out tablets with the previous group’s writing still on them and ask pupils to start by erasing them. (To prevent pupils from skipping both erasing and writing and just handing the tablet back in as their own work, you can draw a large X through the writing – that is also authentic.)
Eventually the wax may become so thin and/or gouged that the tablet can’t easily be erased. The easiest way to fix such tablets is to get thin sheets of wax (we use these: https://www.der-roemer-shop.de/Tabula-Noctis-Wachsplatten-Schwarz-10er-Set-fuer-Wachstafelbastelsets), tear off a tablet-sized piece, and push it onto the existing wax with your thumbs until it sticks solidly. But if there’s still enough wax on the tablet, just not in the right places, you can heat the eraser end of a metal stylus in a candle flame and use that to melt the wax back into place. (It is not a good idea to iron a tablet; that ruins both the tablet and the iron, even if you put something between the iron and the wax. I’m afraid we had to learn this the hard way.)
Both tablets and styluses can get grubby, smeared with wax and looking unloved. Washing them in very hot water with dishwashing liquid and a pot-scouring sponge will fix that, but be sure not to let water containing melted wax go down your sink drain. The cloth bags can be washed the same way, or in a washing machine.
Wooden tablets
The Vindolanda tablets are mostly not waxed, but simply pieces of wood on which scribes wrote with pen and ink. Such tablets cannot be erased and re-used, and wood is now too expensive to make it feasible as a writing surface for pupils under normal circumstances. Moreover writing on wood with pen and ink is hard, because the ink runs owing to capillary action and you get a hopelessly blurry result. The ancient solution to this was to rub the wood with a very light coating of beeswax, just enough to stop the ink from running but not so much that the ink doesn’t stick at all; this does work, but only if you put honey in your ink (see below on ink-making). A modern solution is to spray the wood with artists’ fixative spray, but not all kinds of fixative do the job. To make replica Vindolanda tablets you need extremely thin wood, because the tablets were folded in half after writing; the only thing that seems to work is veneer. And you need to wait several hours between writing the tablet and folding it, for the ink to dry. On balance we find that it’s not usually worth it; replica Vindolanda tablets are best made from cardboard.
Where wooden tablets are useful, though, is for reading materials prepared by the teacher. Often one wants to put those materials on papyrus, but sometimes wood is a better bet: when your texts will receive a lot of wear and tear (e.g. with younger children), when your ancient school is specifically set in Britain (from which no papyrus rolls actually survive, but lots of wooden tablets), and when you want to give out short texts that on papyrus wouldn’t give even the illusion of a roll. For these tablets you need wood about an eighth of an inch thick, not veneer. Plywood is not authentic, but we use it anyway because we have been unable to source solid wood of the right size and shape. The tablets can of course be any size you need, but pieces about the size of a postcard are more authentic than ones the size of a sheet of paper. We buy a large sheet of plywood and saw it up into whatever sizes we need; we try to make all the tablets of one particular text the same size and shape but to use different sizes for different texts, to make it easier to find things quickly. You can coat the surface with wax or fixative and then write with pen and ink, but we find that simply using a biro (ballpoint pen) on the uncoated surface is easier. If you do use pen and ink, we recommend using not ancient ink but modern indelible ink: tablets do sometimes get wet and you don’t want the ink to run when that happens.
Ostraca
Ancient schoolchildren often wrote on ostraca, that is, pieces of broken pottery. The word ‘ostraca’ often evokes the glazed potsherds used for ostracism in classical Athens, on which one could only write by scratching laboriously. Schoolchildren did not do that; they wrote with pen and ink on unglazed potsherds and sometimes on flat pieces of stone (which are also called ostraca if they bear writing). Broken flowerpots work beautifully as ostraca, as do old clay roof tiles and broken stone slabs from patio flooring. One can usually get these for free, either from building refuse or from garden centre waste.
Ancient pupils often used small ostraca and wrote on them in tiny letters, but writing in tiny letters is really hard when you’re not used to dip pens. Give your pupils a break – get them big ostraca!
Newly broken potsherds have sharp edges. It’s best to sand these down before use, and it’s a good idea to transport ostraca in cloth bags or cardboard boxes, not in plastic bags which they can easily cut through.
You’ll want to be able to re-use your ostraca, so ink that washes off is important. We recommend testing any ink on a small fragment before letting anyone use it to write on your main collection of ostraca. All writing should disappear when the ostraca are washed in hot water with dishwashing liquid and a pot scrubber.
Ostraca can be re-used immediately after washing, even if they are still wet. So if you have time between two groups to wash the ostraca, you only need as many as there are pupils in the largest group.
Pens
Ancient pens could be made out of a wide variety of materials, but the most practical ones to replicate today are reed pens. To make these you need hard, rigid, hollow reeds; most of those that grow in England are too soft, and tree twigs do not work because they are not hollow. We use bamboo, which although not authentic works perfectly. Bamboo is soft and easy to carve when freshly cut, and when dry it becomes hard and durable; if you use bamboo we recommend carving it fresh. To carve a pen, cut off a piece of reed about as long as a new pencil, take a sharp craft knife, and trim one end of the reed until it looks like the reed on the right in these pictures. Then carefully slit the tip down the middle (the slit should be about a quarter of an inch long), so that it looks like the reed in the middle, and then trim both sides of the nib until they are close to the slit, as in the reed on the right.


You can also buy reed pens; we used to buy these before we learned how to make our own: https://www.der-roemer-shop.de/Schreibrohr-aus-Schilf-Calamus-Kalligraphie-Stift.
Pens wear down quickly, especially when writing on ostraca, so you will need to be able to recut them. This is basically the same process as making them, with the result that one has to learn how to cut pens and there’s little point in ever buying them. You can tell when a pen needs recutting by the fact that it no longer writes well: it makes a double line, or a very thick line, or it only writes a few letters before needing more ink. A good pen should allow you to write at least a dozen letters before you need to dip it again.
Pens also become clogged with dried ink, which stops them from working. The best way to avoid this is to stick pens in water immediately after use (or between use by one pupil and use by another), and then wash them with hot water and dishwashing liquid at the end of the event. That works fine when you’re doing a demonstration of ancient writing materials in modern dress, but it doesn’t really work in a proper ancient schoolroom, where you won’t have a good place to put the bowl of water and where the fact that this solution isn’t authentic becomes a problem. So in those circumstances we advise using pen-wipers during the event and washing the pens with water at the end: wiping ink off reduces mess but doesn’t prevent it from clogging the pen as it dries. In fact, since pens are very good at holding ink, wiping them off may not prevent them from getting ink on everything they touch. Therefore we store pens in paper cups, point down, to avoid them getting ink on other schoolroom materials.
Although Greek and Latin were written with pens, the Egyptian language was normally written with a brush. Therefore if you want to write hieroglyphs you should get little paintbrushes.
Pen-wipers
The ancients wiped ink off their pens with rags. These are best made by cutting up old cotton sheets into pieces roughly one foot square; synthetic fabrics aren’t absorbent enough, and towels aren’t authentic as the ancients did not have terrycloth. Ideally, the cloth used should be a solid colour, not patterned. We issue every pupil with a pen-wiper when we give out pens, and ask them to wipe the pen before bringing it back; for safety’s sake we then also wipe the pen ourselves before putting it back into the paper cup for re-use.
Pen-wipers get very inky and dry slowly, so one shouldn’t try to re-use them within a day. It’s a good idea to wash them occasionally; washing doesn’t get the inkstains out, but the fabric becomes flexible again.

Inkwells
Inkwells are worth investing in. Not only are they the authentic solution to holding ink, but they are the best solution, being much harder to knock over than other containers. We use these inkwells: https://www.der-roemer-shop.de/Tintenfass-terra-sigillata-roemisches-Tintenfass. The little hole in their rims is for pouring the ink out when you want to put it back in the bottle at the end of the day (use a funnel!); it’s very hard to pour ink out of the big hole.
Inkwells are inevitably open at the top, so on hot days water evaporates and the ink gets thicker. The process is compounded if you use unglazed inkwells as we do, because the inkwell itself absorbs moisture: by lunchtime on a hot day the ink in an unglazed clay inkwell can become unusable. This problem is authentically ancient, of course, and the ancient solution was for writers to recognise when their ink was getting too thick and add a little water. But modern pupils can hardly be expected to do that, so it’s a good idea to monitor the ink yourself. On hot days we rinse out the inside of our inkwells with water before pouring the ink in, and that helps a lot.
Don’t let pupils leave their pens in the inkwell. In the first place being left in ink clogs the pens, and in the second place the rim of the inkwell is usually inky, so pens left leaning against it get covered with ink exactly where the next writer needs to hold them. And ink on the pupils’ hands is often rapidly transferred to their clothes, faces and hair.
Ink
Modern ink aims to be indelible, which makes it less than ideal. The best modern ink for an ancient school is Chinese ink, which is similar to ancient ink and is great for writing on paper or cardboard; it is said to wash off, but in reality it doesn’t wash off ostraca well enough that one can re-use the ostraca. The only way to get ink that enables you to re-use ostraca is to make it yourself, and there are two ways to do that.
The easiest way is to find some liquid watercolour paint and dilute it until it reaches the consistency of ink and you can write with it using one of your pens. Not all watercolour paint will really wash off ostraca, so you will need to test yours – be sure to let it dry fully on the ostracon before trying to wash it off, as the dried ink is hardest to remove. If it doesn’t wash off, try again with a different kind of watercolour paint. (We have had good luck with Giotto Poster School Paint.) Unfortunately, the diluted paint mixture tends to separate fairly quickly into paint and water, so if you make ink this way you usually need to shake it well just before use.
The other possibility is to make replica ancient ink. This is harder, but it’s a lot of fun and one can get the pupils to participate. You will need a small mortar and pestle (three or four inches in diameter), some gum Arabic as binder, some burnt wood or black powder as pigment, water, and maybe a bit of honey. Also a table well covered with newspapers, and clothes you can cope with getting ink on: the process can be messy, and while ancient ink does wash off ostraca, it is fiendishly hard to get out of fabric. If you want to be super-authentic, you buy your gum Arabic as solid pieces (this is how it comes naturally: it is Acacia tree sap) and put one in a little water so that it dissolves overnight into a liquid. An easier option is to buy the gum Arabic as liquid. It’s commonly sold in artists’ supply shops, in bottles with convenient nozzles. (Don’t buy the powder form; that’s useless for ink making.)
The pigment also has more and less authentic options. The authentic option is to take some very burned wood from a fireplace, the kind that is lightweight and crumbly and almost ready to become ash, but still black. You grind this into powder in the mortar and pestle, but that process can take a while and may not work well if your pupils are impatient – for you really do need to end up with a powder, or the ink won’t work. The less authentic option is to buy powdered black pigment from an artists’ supply shop. The kind that is called ‘lampblack’ is not only the most authentic but also the one that works best; we once used burned bones on the grounds that that powder looked blacker, and the resulting mixture fermented, escaped from its jar and ran amok on a bookcase, with an appalling smell.
You need to have about half an inch of powder in the bottom of your mortar, whether you get that by grinding charcoal or by pouring in powder. You then add a few drops of gum Arabic liquid and mix carefully with the pestle to form a thick paste. If you are using honey, the next step is a few drops of honey and mixing that in, so that you end up with a gloppier paste. Then you add water gradually, mixing it in until the mixture seems thin enough to write with, and then you dip a pen in and try it. (At this point we like to issue all the pupils who are helping make the ink with pens and let them all try it simultaneously.) If the trial suggests that the ink is still too thick, add more water and try again. Ink can be used directly from the mortar, but to keep it you will need to pour it into a jar or bottle with a lid. Make sure that the seal on your chosen vessel is completely inkproof, since old ink needs to be shaken vigorously before use.
Honey is needed only for writing on beeswax-coated wood (see above); for other writing surfaces the ink works fine without it.
Only black ink is authentic: the ancients did not write in blue or red. But there is another kind of ancient black ink made from oak galls and iron. That kind is not suitable for ancient schoolrooms, both because it was used only in late antiquity and the middle ages and because it does not wash off ostraca.
Papyrus
For most of antiquity (from at least the fourth century BC to the third century AD), Greek and Latin books were mainly written on rolls of papyrus. But papyrus was expensive (even in Egypt, where it was produced, and even more so in places where it had to be imported), so it was not typically used for school pupils to write on. That is just as well, for it is still too expensive for that purpose. However, papyrus is not prohibitively expensive and is usually the best material on which to write texts that the teacher prepares for pupils to read.
In antiquity, papyrus was manufactured in large sheets that were glued together in long rolls before being sold. So not only were books normally written on papyrus rolls, but shorter texts such as letters were often written on pieces cut off rolls. The roll is the quintessential form for papyrus, not the sheet. You can still buy papyrus rolls today, but it’s not normally worth it, because you’d have to fill the roll with writing and then no pupil would read enough text to get through more than the first sheet of it. So a better option is to buy sheets of papyrus and keep them rolled up until they develop a permanent curl; that way they mimic rolls without so much effort on your part.
We buy sheets about the size of a piece of paper (usually these: https://www.der-roemer-shop.de/papyri-herculaneum-aegyptisches-papyrusblatt), with ragged edges, and trim the edges with scissors so that they are regular but not too precise. One can also get machine-trimmed papyrus sheets, but those are a bit less convincing.
A sheet of papyrus has two sides; on one the papyrus fibres run vertically, and on the other they run horizontally. Ancient scribes normally wrote along the fibres, that is on the side with horizontal fibres, because it is more difficult to write across them. They only used one side because when your book is a roll all the writing has to be on the inside. So to create a papyrus ‘roll’ you can turn your papyrus sheet so that in landscape format (with the long edges horizontal and the short ones vertical) the side facing up has the horizontal fibres, write two columns of text leaving margins between half an inch and one inch on all four sides, and then roll the sheet up from right to left, so that when you unroll it the left side of the first column appears first. If you leave it rolled up for a week or so it should keep that shape.
Like wood, papyrus has fibres that can cause ink to run by capillary action if you write with pen and ink. The same solutions used for wood could be employed, but if you are trying to copy out a lot of text the only sensible option is to use a modern pen. Having said which, some pens do not write well on papyrus; you need a dark, strong line, because the writing surface is not a uniform colour, so we find that felt-tip pens often work better than ballpoints.
Papyrus is fragile, so it’s worth asking students to be gentle with it. But despite your best efforts, some of your papyri will soon start to come apart. Cracks and tears can be repaired by gluing strips of papyrus onto the blank back of your roll, and such repairs are totally authentic. Be sure to use a flexible glue (ones designed for paper are usually good), because glue that makes a rigid join will immediately lead to more cracks along the sides of the patch.
Arithmetic equipment
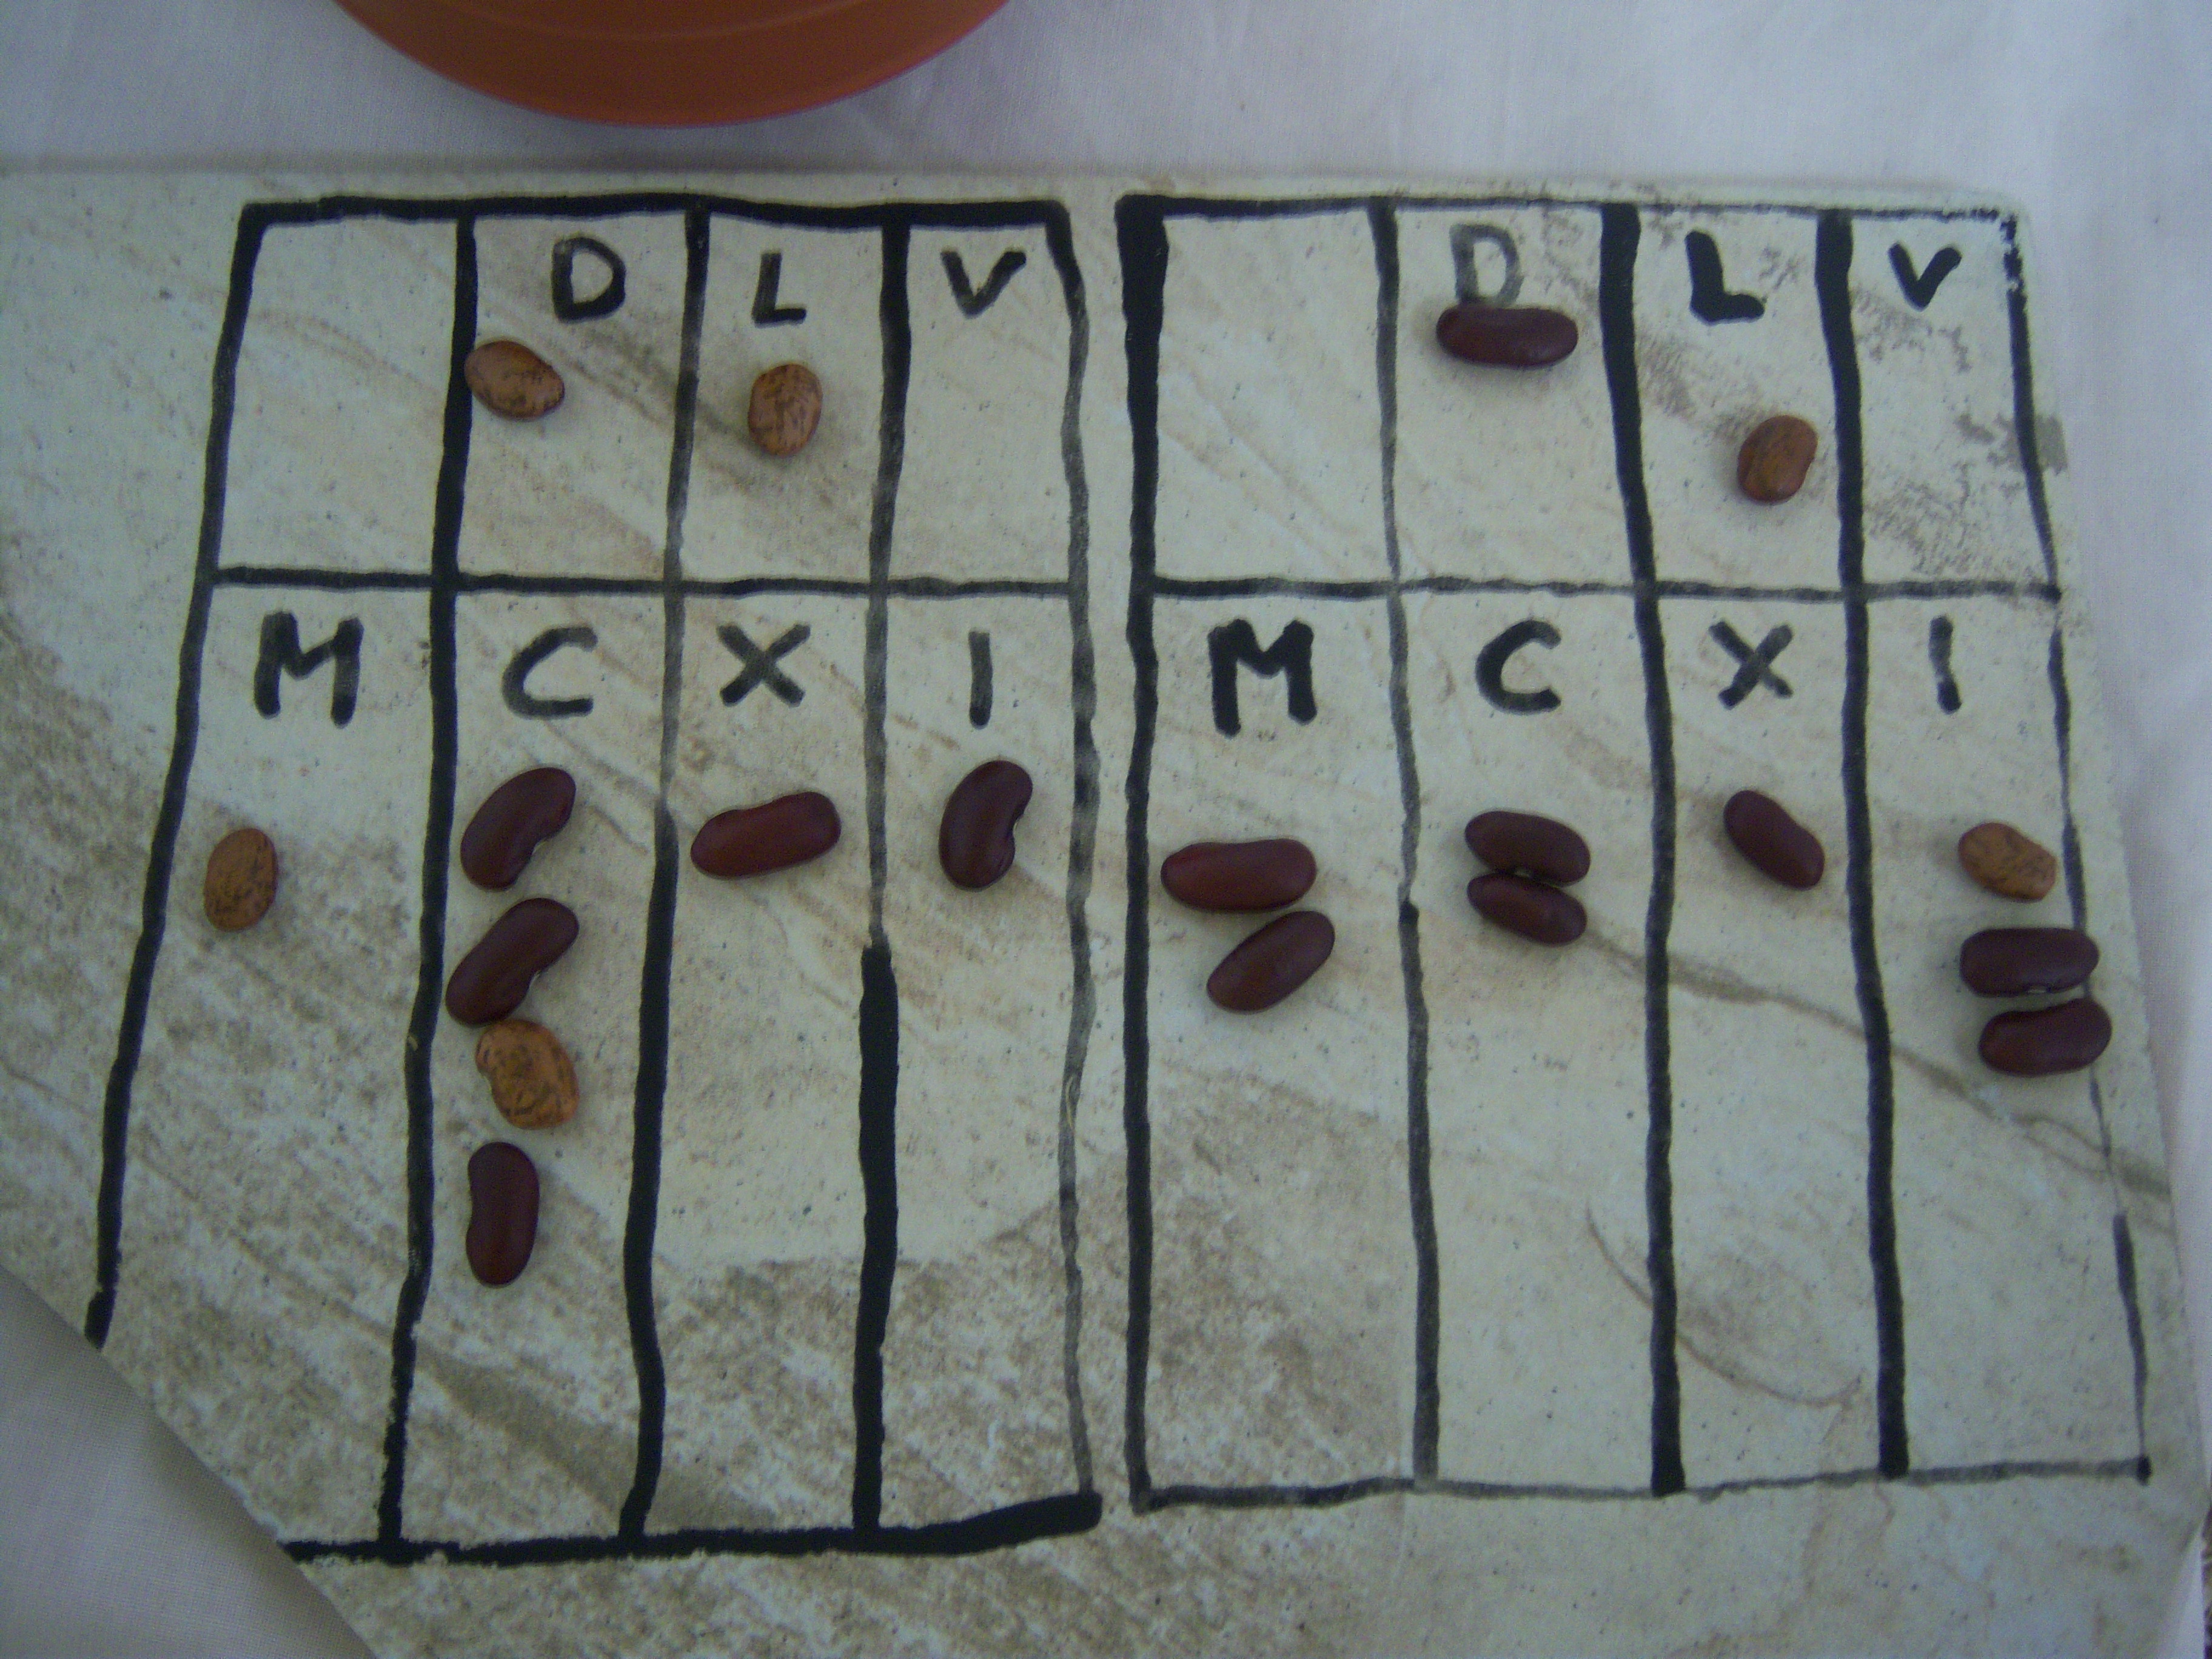
For arithmetic you need counting boards and counters. As counters we use dried kidney beans; these are authentic, lightweight, a good size, and stay where you put them. Dried peas or chickpeas tend to roll around, and pebbles are usually too heavy if you are bringing enough for a whole group. Each pupil needs one handful of beans, which can be collected afterwards and re-used. Pupils will ask if they may eat the beans: no, dried kidney beans are not edible without cooking.
If you are in a modern classroom, you can print counting boards out on paper and rest them on nice flat desks. But in an ancient schoolroom the counting boards need to be rigid, since there are no desks. (Although we often have a table for arithmetic, it is unrealistic to suppose that everyone doing arithmetic will always be able to fit around the table, so pupils need to be able to function without it.) If your ostraca are flat, you can draw counting boards on those; otherwise it’s easiest to make counting boards out of wood.
Counting boards can be made in various forms, depending on what you need: the basic form has four columns and goes from ones to thousands, but you can also make boards with extra columns to the left for higher numbers, or extra columns to the right for fractions. Here is an outline for the basic form, which is normally the best one to use; for other options see the ancient schoolroom arithmetic videos at https://www.youtube.com/@ReadingAncientSchoolroom, particularly the ones with fractions.

The arithmetic teacher should have something to write with and on, to note down what problem the pupils are doing and avoid the unpleasant situation of getting an answer and not being able to check it because everyone has forgotten what the question was. A wax tablet and stylus will work, as will a large ostracon with pen and ink; in the latter case it’s kind to also give the arithmetic teacher a sponge and a bowl of water so that the ostracon can be erased and re-used.
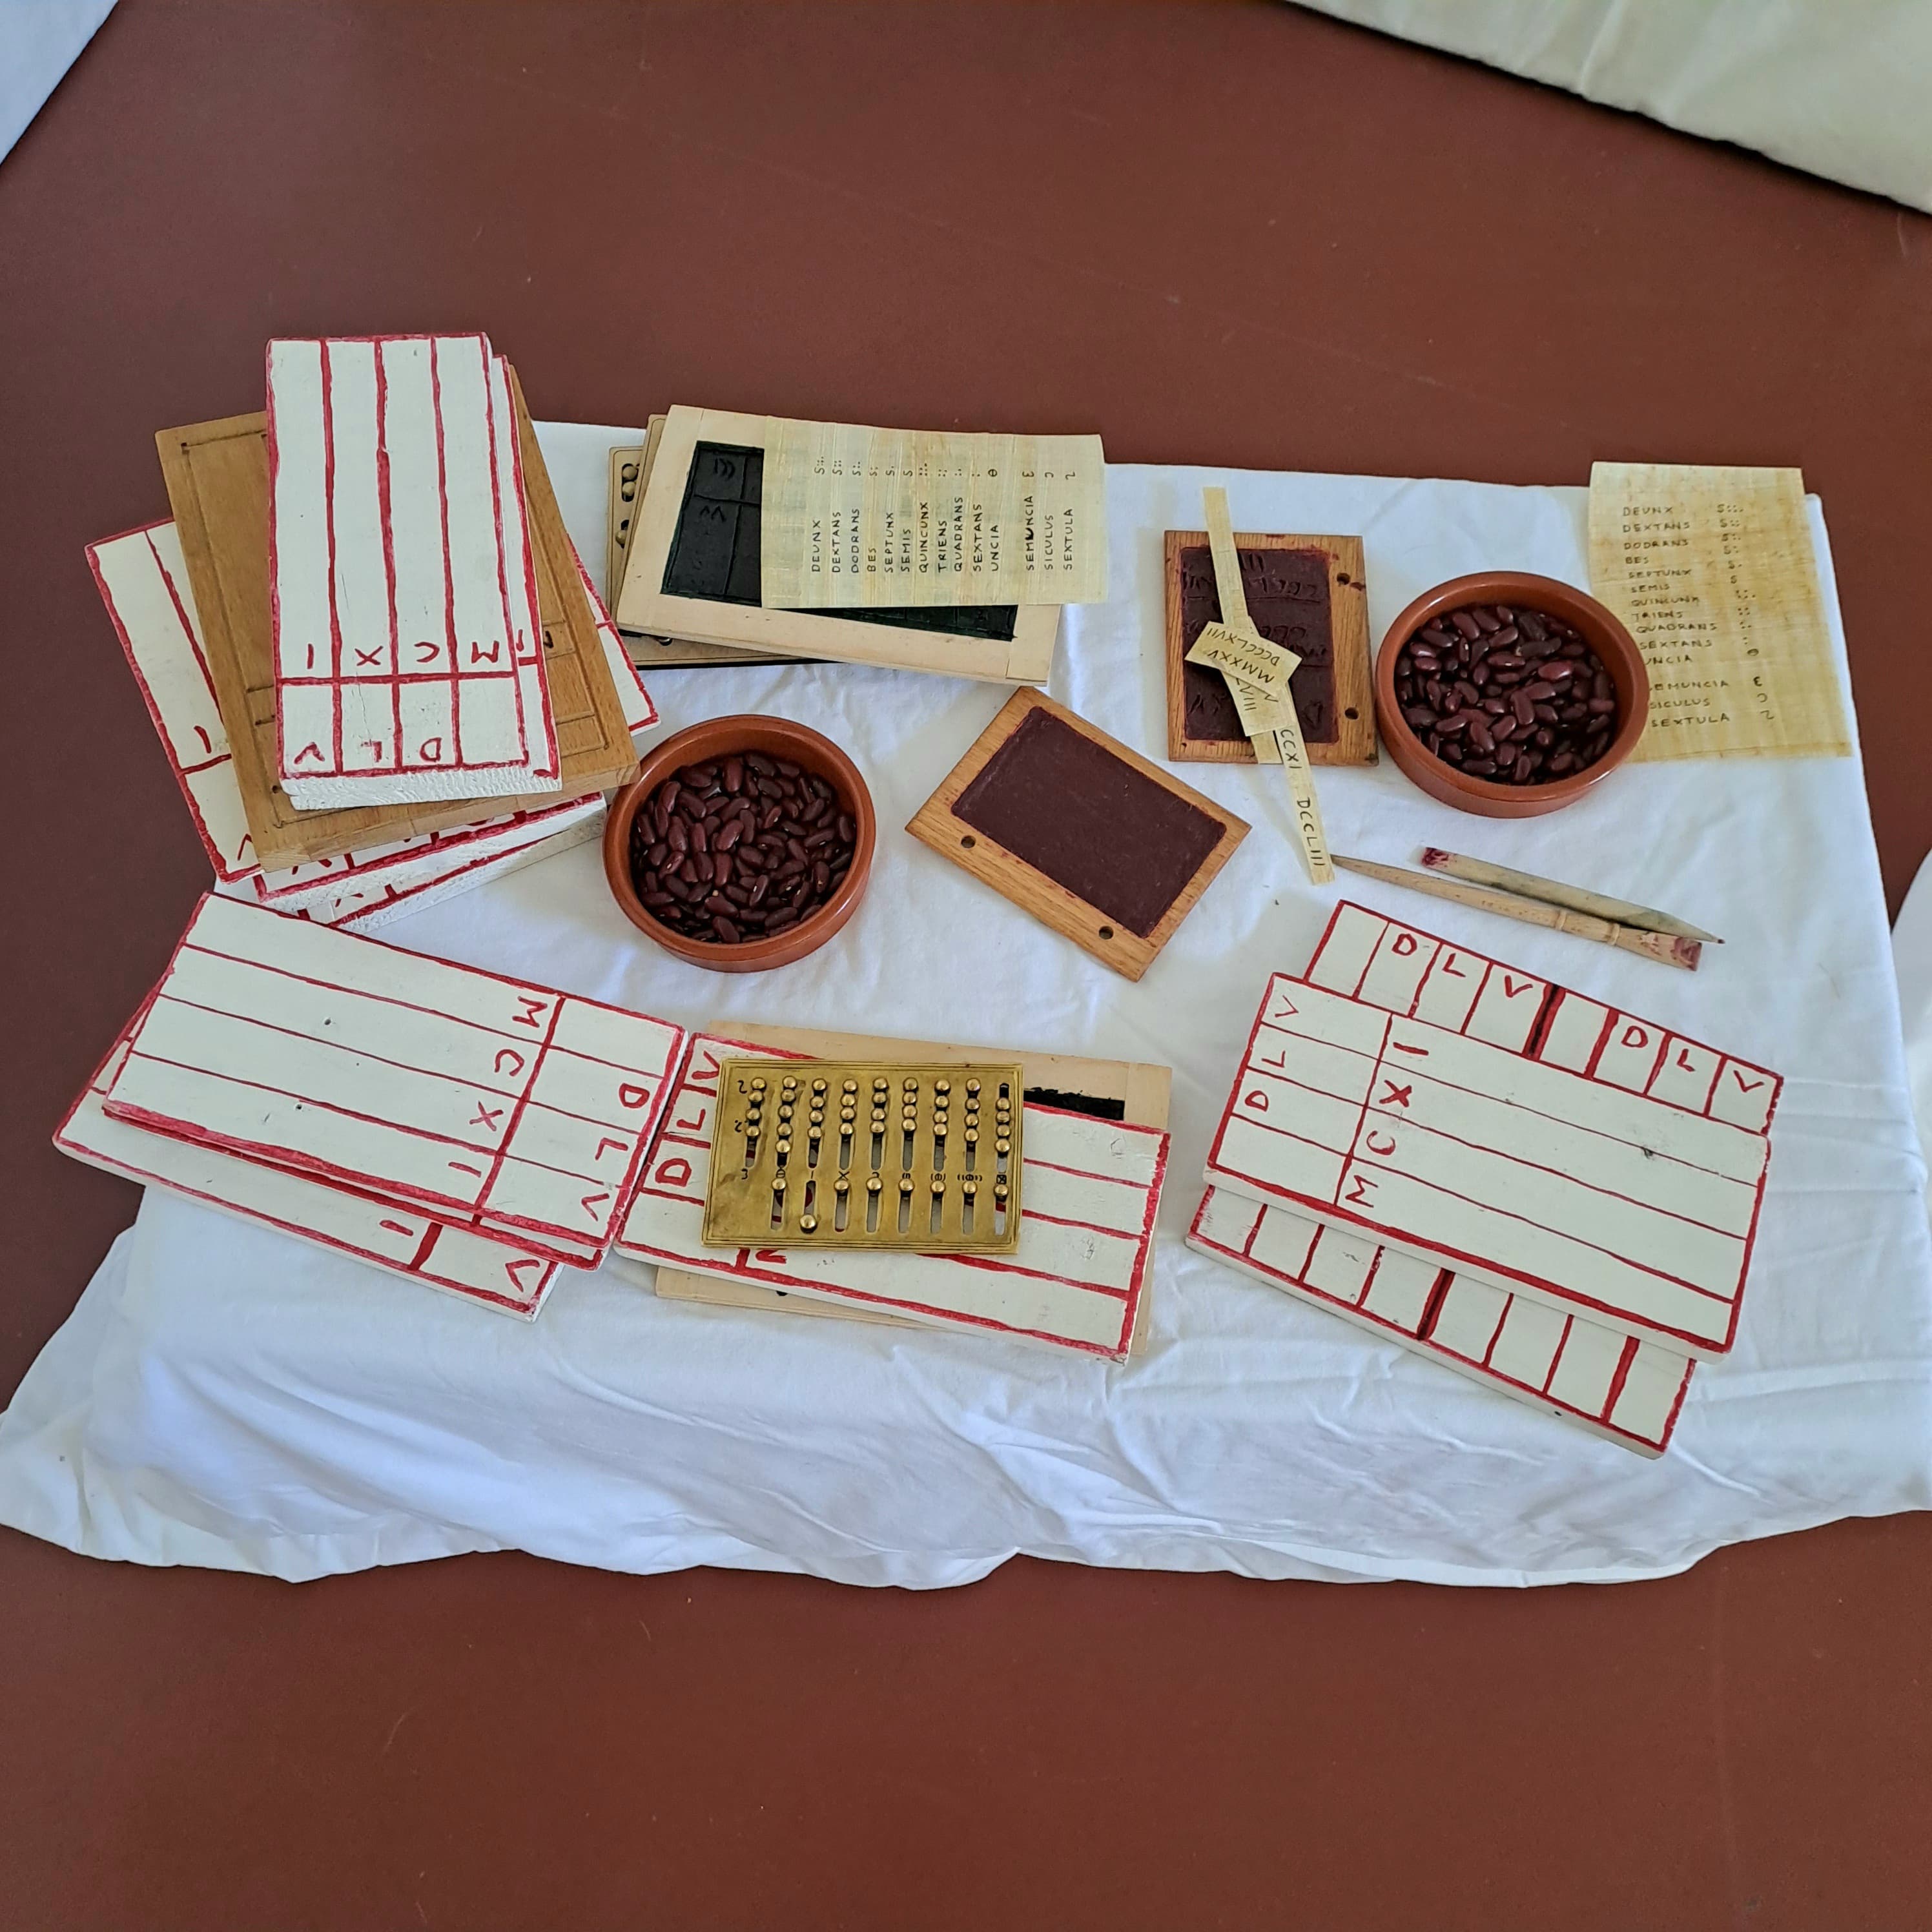
Romans often used abacuses, and one can buy a Roman abacus here: https://www.der-roemer-shop.de/Abakus-Rechnen-wie-die-Roemer. But most pupils find the abacus much harder to use than the counting board, so it may be better to bring only one abacus to show them, and have pupils do their own calculations on a counting board.
Other equipment
We recommend a large plastic dishpan for carrying used ostraca and other inky items to a sink and washing them; for the washing you will also need dishwashing liquid, pot scrubbers, and some old towels on which wet items can be spread out to dry. A small funnel is useful for putting unused ink back in the bottle. If you have a schoolroom slave, it is useful for the teachers to have bells that can be used to summon him or her. It can also be useful to have some Roman-looking cups so that the teachers can have water if they get thirsty during a session.
Note on our relationship with Der Roemer Shop
Actually we haven’t got one: they do not give us anything for pointing people to their products, and they probably aren’t even aware that we do it. We post links to their site purely because we have found it very useful and think that others might too.
